

Hello everyone! Thank you for watching the video. In this “Work Smarter Not Harder” article, you’ll learn how to create a budget template that automatically tracks how much money is left in each category based on your input. The best part? Assembly takes less than 15 minutes! Let’s start.
Make sure you are logged in and click on the bell notification 🔔
Before we start the tutorial, please take 7 seconds to click the subscribe button and ring the notification. This way you’ll be the first to be notified when we publish a new video at least once a week. Please feel free to hit the Like button and tell us how you found our channel in the comments section. Thanks!
Create a budget template table
Okay, the first thing you need to do is create a table to enter your transactions. Start by adding a title. You can add any headers you want, but for simplicity we’ll use these:
– moon
– date
– describe
– Transaction Type
– Income value
– set point
– running balance
To convert the table into an organized view, we change the row color. Select the table and go to the “Format Table” option on the start bar. Choose a green alternating color. This makes it easier for you to track your budget. However, you can also choose any color you like best.
Next, add the necessary formulas and number formatting to the table to make it work for you. First, we add the start date in the Month column. To create the formula, we set the date format to “Month – Year”. Right-click the column, select Format Cells, and change the date format to your liking.
We’ve now added a dropdown in the “Transaction Category” column so you can select a fee category. To do this, select the column, hold down the Ctrl key and select the header. Then go to the “Data Validation” option on the ribbon, select “List” and allow drop-down lists. In Source, enter the desired categories, separated by commas. For example: “Income, mortgage, utilities, groceries, gas, entertainment.”
Run balance formats and formulas
The next step is to format the revenue value and goal value columns as currency. Just highlight the columns and click the dollar sign on the Home tab.
Now let’s add the formula to calculate the current balance. We’ll add some transactions to the list to see how it works. In its simplest form, we give you two formulas:
- In the Current Balance column, enter =sum([previous cell]+[revenue]-[expense])”.
- In the next cell, enter “=Sum([Starting Balance]+[Revenue]-[Expenses])”.
To automatically fill in the formula for the rest of the column, select the cell containing the formula, drag it down, and then release.
Add a progress bar to track your budget
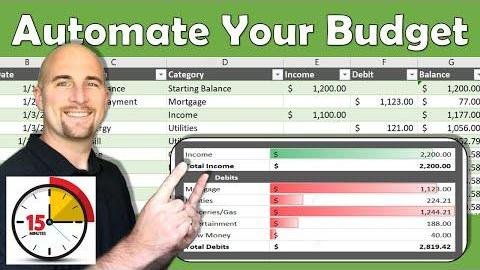
Now that the spreadsheet is set up, let’s add progress bars to show how much more you need to earn and how much you can spend in each category.
Track earnings
To track your earnings, click on the cell containing the earnings value and go to the Home tab. Click Conditional Formatting and select the data column. Choose green to represent income. Stretch the column to make the progress bar longer.
Track expenses
To track your spending, click on the cell containing the budget value and go to the Home tab. Click Conditional Formatting, Manage Rules, and then double-click an existing rule. Here you can change the minimum and maximum quantities to suit your budget. For example, if your budget for gas and groceries is $100, change the maximum amount to $100.
Add monthly and outer boundaries
To make your budget template more visually appealing and user-friendly, consider centering the month in cell I1, adding a subtitle, and adding an outer border to the table.
Automatically complete your budget in 15 minutes ⏰
That’s it! You can start adding your expenses and income and watch the current balance and progress bar change accordingly. The great thing about this template is that it can be set up for each month, so you can easily automate your budget in just 15 minutes.
Thank you for watching! Hello friends, did you learn anything new from this video? If so, hit the subscribe button and ring the notification bell to be the first to be notified when we post new videos every week. Don’t forget to hit the Like button and share your thoughts in the comments section. Thank you for your support and look forward to your next visit!
Disclaimer: The video content displayed above was created and is the property of Work Smarter Not Harder. We do not claim any rights to this content and are not in any way endorsing or affiliated with the creators. This video is embedded here for informational/entertainment purposes only. The accompanying articles, although sometimes narrated in the first person, are independently written by our editorial team and do not necessarily reflect the views or expressions of the video creators.